Phoenix Insulation Questions Answered: Your Complete FAQ Guide

From spray foam basics to attic R-values and rebate details—get straight answers from Phoenix’s trusted insulation experts

GENERAL INSULATION QUESTIONS

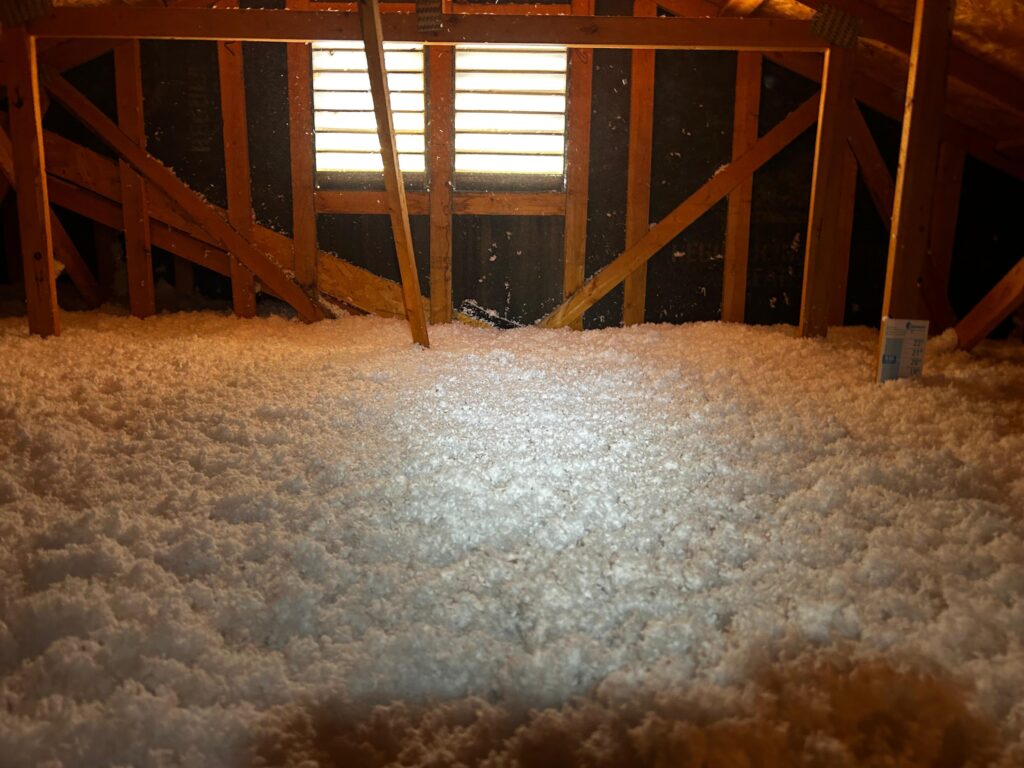
For Phoenix (Climate Zone 2), Energy Star recommends R-38 to R-49 for most attics during retrofit projects. If your attic currently has little to no insulation, we typically recommend upgrading to R-49 (approximately 16-17 inches of blown-in fiberglass). If you already have 3-4 inches of existing insulation, bringing it up to R-38 (around 13-14 inches total) provides excellent performance.

During your free inspection, we’ll measure your current insulation depth and recommend the most cost-effective upgrade path. The right R-value depends on your current condition, HVAC system, and energy goals—there’s no one-size-fits-all answer.

Why it matters in Phoenix: Arizona’s extreme attic temperatures (often 140°F+ in summer) make proper insulation critical for comfort and energy savings. Every additional R-value helps reduce the load on your air conditioning system.

While we can’t guarantee specific dollar amounts (every home is different), properly installed attic insulation combined with air sealing typically reduces cooling costs by 15-30% for Phoenix homes that were previously under-insulated.

The biggest savings come from homes that currently have:

  • Less than R-19 (under 7 inches of blown insulation)
  • Significant air leakage at top plates, penetrations, or can lights
  • Leaky ductwork in unconditioned attic spaces

With Phoenix electricity averaging around 15-16¢/kWh, and many Valley homes spending $200-400/month on summer cooling, even a 20% reduction translates to $480-960 in annual savings. Most homeowners see ROI within 3-5 years, especially when combined with available APS or SRP rebates.

Real numbers example: A 2,000 sq ft home upgrading from R-11 to R-49 typically sees 1-3 degree indoor temperature improvement and measurably lower AC runtime.

Spray Foam Insulation:

  • Best for: Air sealing + insulation in one application; roofline encapsulation
  • Open-cell: ~R-3.7 per inch, sound dampening, cost-effective for larger areas
  • Closed-cell: ~R-6-7 per inch, moisture resistant, structural rigidity
  • Use case: New construction rooflines, complex cavities, metal buildings


Blown-In Fiberglass (our most common attic solution):

  • Best for: Attic floor insulation, fast installation, proven performance
  • R-value: R-38 at ~13″, R-49 at ~16-17″ (using Knauf Jet Stream Ultra)
  • Benefits: Cost-effective, easy depth verification, no settling issues
  • Use case: Most Phoenix attic retrofits, especially when paired with air sealing


Batt Insulation:

  • Best for: New construction wall cavities, accessible spaces
  • R-value: Varies by thickness; requires precise installation
  • Limitation: Gaps/compression reduce effectiveness; harder to retrofit into existing attics


Bottom line for Phoenix homes:
For attic upgrades, we most often recommend blown-in fiberglass because it fills all gaps, is verifiable with depth markers, and provides excellent performance at the best value. Spray foam shines when you’re encapsulating a roofline or need both insulation and air sealing in complex spaces.

It depends on three factors:

Remove old insulation if:

  1. Contamination present: Rodent droppings, mold, water damage, or smoke contamination
  2. Severe compression: Old insulation has collapsed to less than 50% original thickness
  3. Air sealing required: You want to properly seal bypasses at top plates and penetrations (we can only air seal after removal)


Top-off existing insulation if:

  • Current insulation is clean, dry, and maintaining its loft
  • No signs of pest activity or moisture damage
  • You’re okay with not addressing air leakage issues (less effective but lower cost)


Our recommendation for Phoenix attics:
We typically suggest the full sequence (Remove → Air Seal → R-30 or higher) because:

  • Phoenix attics often have rodent or dust contamination from monsoon vent gaps
  • Air sealing reduces bypass losses by up to 30%—you can’t access top plates with insulation in place
  • Starting with a clean slate ensures proper coverage and depth verification


Pricing transparency:
Removal is $1.20/sq ft, air sealing is $250 per 2,000 sq ft minimum, and re-insulation to R-30 averages $1.15/sq ft—or we offer the complete package at $2.75/sq ft (Remove + Air Seal + R-49).

Note: All removal estimates assume full attic access; final pricing confirmed after in-person inspection.

  • Blown-in fiberglass: 20-30+ years when properly installed and maintained
  • Spray foam: 30-80+ years (essentially permanent when applied correctly)
  • Batt insulation: 15-20 years (settles and compresses over time)


Phoenix-specific considerations:
Attic heat and UV exposure don’t typically degrade modern fiberglass or spray foam. The biggest threats to insulation longevity in Arizona are:

  • Rodent or pest intrusion
  • Roof leaks causing moisture damage
  • Poor ventilation (though less critical if you’ve encapsulated the roofline)
  • HVAC work that disturbs or removes sections


Maintenance tip:
We recommend a visual inspection every 5 years, especially after roof work or pest control treatments. Our free attic inspections include depth checks and photos so you know exactly what you have.

SPRAY FOAM INSULATION FAQ

FeatureOpen-Cell Spray FoamClosed-Cell Spray Foam
R-value per inch~R-3.6–3.9~R-6–7
DensityLow (~0.5 lb/ft³)High (~2 lb/ft³)
Air sealingExcellentExcellent
Moisture barrierSemi-permeableExcellent vapor barrier
CostLowerHigher
Best forInterior rooflines, sound dampening, large areasLimited-depth cavities, moisture control, structural rigidity

For Phoenix homes:

  • Open-cell is our most common recommendation for attic roofline encapsulation—it creates a semi-conditioned attic, expands to fill all gaps, and provides great thermal performance at a lower cost
  • Closed-cell makes sense when you need maximum R-value in minimal space (like metal buildings) or require a moisture/vapor barrier


Code compliance note:
All spray foam applications must meet fire/ignition barrier requirements per IRC—this is factored into our installations.

Absolutely—but the application method matters.

Two approaches:

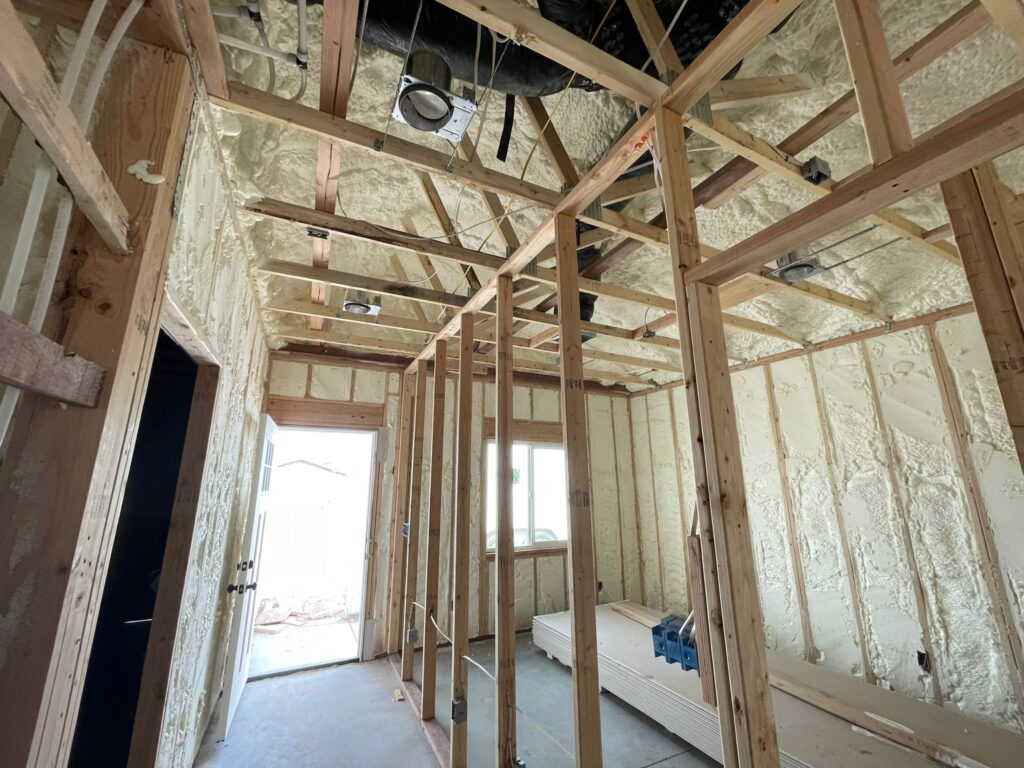
Option 1: Roofline Encapsulation (most common for spray foam)

  • Spray foam applied directly to the underside of the roof deck
  • Creates a semi-conditioned attic space
  • Keeps your HVAC ducts inside the thermal envelope
  • Most effective when combined with ductwork in the attic
  • Typical depth: 5-6″ of open-cell for R-18 to R-23


Option 2: Attic Floor (less common)

  • Spray foam on attic floor joists
  • Attic remains unconditioned
  • Less common because blown fiberglass is more cost-effective for flat attic floors


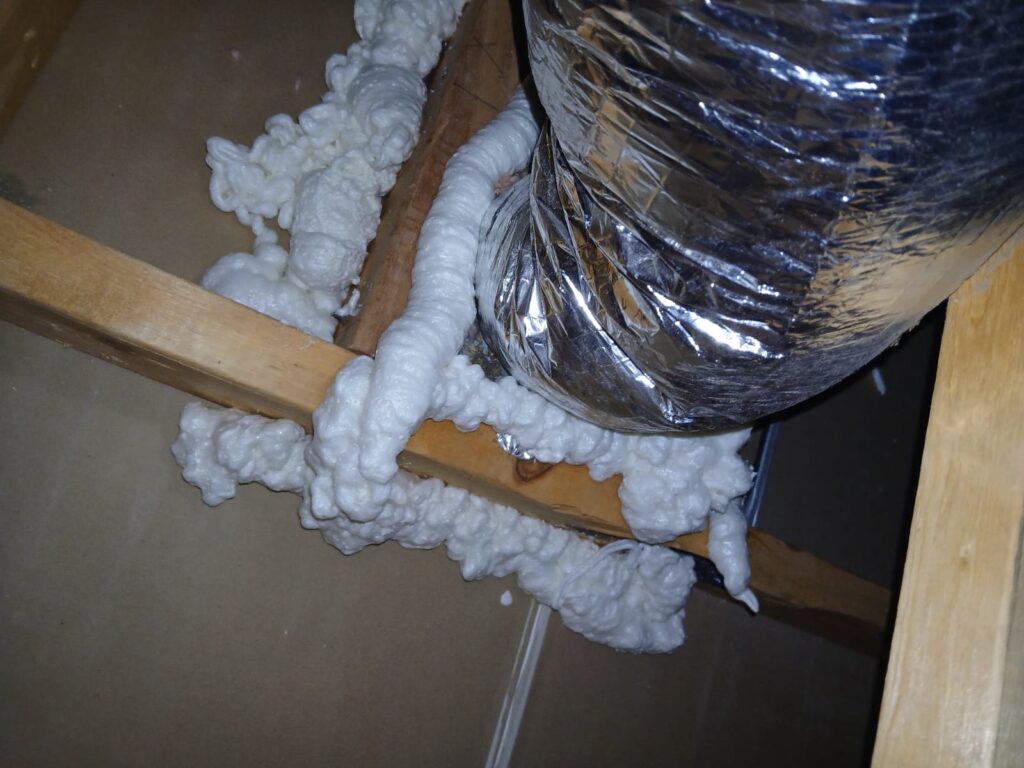
Important Phoenix consideration:
If you have ductwork in your attic, roofline encapsulation with spray foam can be a game-changer. Instead of ducts sitting in 140°F+ attic temps, they’re in a space that stays much closer to your indoor temperature—dramatically improving HVAC efficiency.

Pricing: Spray foam is quoted after site assessment because every roofline is unique. Request your free estimate and we’ll walk you through whether spray foam, blown-in, or a combination approach is best for your home.

Yes—when properly installed by trained professionals, spray foam insulation is safe.

Installation safety:

  • We use professional-grade two-part polyurethane systems from reputable manufacturers
  • During application, the area is masked and protected
  • Proper ventilation and curing time (typically 24 hours) before re-entry
  • Our crews use full PPE including respirators during application


Post-installation:

  • Once fully cured (24-48 hours), spray foam is inert and does not off-gas
  • No VOCs or harmful chemicals are released during normal use
  • Safe for homes with children, pets, and sensitive individuals


Third-party certifications:
Most spray foam products carry GREENGUARD certifications and meet EPA indoor air quality standards post-cure.

Phoenix-specific concern: In extreme attic heat (140°F+), properly installed spray foam remains stable and does not break down or release odors. Poor installation or wrong products can cause issues—which is why hiring experienced, licensed contractors matters.

ATTIC INSULATION QUESTIONS

Hot rooms in Phoenix homes usually come from one (or more) of these attic issues:

1. Insufficient insulation:

  • Many Phoenix homes built before 2000 have only R-11 to R-19 (4-7 inches)
  • Modern Energy Star recommendations call for R-38 to R-49
  • Every degree hotter your attic is translates to more heat radiating into living spaces


2. Air leakage (bypasses):

  • Unsealed top plates, can lights, and penetrations allow hot attic air to infiltrate
  • Even with thick insulation, air leaks reduce effectiveness by 20-40%
  • You can’t see these bypasses without pulling back existing insulation


3. Duct leakage:

  • If you have flex ducts in the attic, they often leak 20-30% of conditioned air
  • Supply leaks blow cold air into 140°F attics (pure waste)
  • Return leaks pull hot, dusty attic air into your home


4. West-facing rooms or cathedral ceilings:

  • Afternoon sun exposure combines with inadequate roof deck insulation
  • Rooms with vaulted ceilings often have minimal cavity depth for insulation


The fix:
Our recommended sequence is:

  1. Free thermal inspection to identify hot spots
  2. Remove old insulation (if needed)
  3. Air seal all bypasses and penetrations
  4. Re-insulate to R-38 or R-49
  5. Consider Aeroseal® duct sealing if ducts are in unconditioned space

Most Phoenix clients see 1-3 degree temperature improvements in problem rooms within the first cooling cycle after a proper attic upgrade.

Using our preferred product (Knauf Jet Stream Ultra blown fiberglass):

  • R-38: Approximately 13 inches installed thickness
  • R-49: Approximately 16.5 inches installed thickness


Pricing based on R-value targets:

  • R-38: $1.30/sq ft
  • R-49: $1.60/sq ft


Example for a 1,500 sq ft attic:

  • R-38 total: $1,950
  • R-49 total: $2,400


Which should you choose?

  • R-38: Good performance for most Phoenix homes; sufficient if you’re already at R-19 and want a cost-effective upgrade
  • R-49: Best performance for new construction or homes currently under-insulated; recommended by Energy Star for Zone 2 when starting from scratch


Cost-benefit:
The difference between R-38 and R-49 is about $450 for a 1,500 sq ft attic. Given Phoenix’s extreme cooling demands, we generally recommend R-49 for maximum long-term savings and comfort—especially for homes with high summer electric bills.

Coverage verification: We use depth markers and take photos at multiple locations to verify proper installation thickness. You’ll receive documentation showing coverage meets the target R-value.

Yes, but carefully—and with proper precautions:

Short answer: You can walk on attic joists after blown-in insulation is installed, but:

  • Walk only on structural joists or blocking—never on drywall between joists
  • Use a flashlight or headlamp so you can see framing members
  • Wear long sleeves/pants and a dust mask (fiberglass fibers can be irritating)


Caution:
Stepping between joists can damage drywall ceilings below and compress insulation (reducing R-value in that area). Many Phoenix homes have 16″ or 24″ joist spacing with only ½” drywall between.

Best practice: If you need regular attic access for storage or HVAC service:

  • Install plywood walkways or decking boards on top of the insulation
  • We can coordinate this during installation or advise on DIY approach
  • Walkways should elevate above the insulation plane to avoid compression


Storage concern:
Deep insulation (13-17″ for R-38/R-49) makes attic storage challenging. Many Phoenix homeowners prioritize energy savings over storage space, but decking platforms can provide both.

It can—but air sealing is the key, not just insulation thickness.

Why Phoenix homes get dusty:

  1. Attic bypasses: Gaps at top plates, can lights, and penetrations create negative pressure that pulls dusty attic air into living spaces
  2. Leaky return ducts: If your return ducts are in the attic and have leaks, they’re sucking in dust and distributing it through your HVAC system
  3. Poor duct sealing: Flex duct connections often have gaps where dust infiltrates


How our process addresses dust:

  • Insulation removal: Clears out decades of accumulated attic dust before starting fresh
  • Air sealing: Seals top plates and penetrations so attic air (and dust) can’t migrate down
  • Aeroseal® duct sealing: Seals duct leaks from the inside, preventing attic dust infiltration into HVAC


Realistic expectations:
Proper air sealing + insulation upgrade reduces dust infiltration from attics, but won’t eliminate all dust sources (outdoor air, HVAC filter quality, pet dander, etc.). Most clients notice a meaningful reduction in dust accumulation, especially on ceiling registers.

Bonus benefit: Less dust infiltration often means better indoor air quality and reduced allergen exposure.

INSULATION REMOVAL & AIR SEALING

Our removal process is designed to be thorough, clean, and safe:

Step-by-step:

  1. Site protection: We lay protective coverings over access areas and pathways to minimize dust
  2. Vacuum extraction: Using commercial insulation vacuums, we remove all existing insulation through large hoses vented outside
  3. Attic cleaning: We remove debris and ensure the attic floor (drywall ceiling) is clear for inspection
  4. Contamination check: Visual inspection for rodent droppings, mold, or moisture damage
  5. Haul away: All old insulation is removed from your property—no dumpster required


Time frame:
Most Phoenix attics (1,200-2,000 sq ft) take 2-4 hours for removal.

What we find: During removal, we often discover:

  • Rodent nests or droppings (especially near attic vents)
  • Electrical wiring issues or junction boxes that need attention
  • Evidence of previous roof leaks
  • Improperly terminated bathroom exhaust fans


Pricing:
$1.20/sq ft for standard attic removal (minimum attic access required; final estimate verified in person)

Next steps: Once removed, we perform air sealing before re-insulating (you cannot effectively air seal with insulation in place).

Air sealing is the process of sealing gaps and penetrations between your conditioned living space and unconditioned attic—and it’s arguably more important than insulation itself.

What we seal:

  • Top plates: Where walls meet the attic floor (biggest bypass source)
  • Can lights/recessed fixtures: Gaps around housings
  • Plumbing penetrations: Vent stacks, water lines
  • Electrical penetrations: Wiring holes, junction boxes
  • Duct boots: Gaps around HVAC supply/return registers
  • Attic hatch/access: Weatherstripping and insulated covers


Why it matters:

  • Studies show that air leakage accounts for 25-40% of heating/cooling loss
  • Even R-60 insulation is ineffective if hot attic air is bypassing through gaps
  • Air sealing improves comfort, reduces energy bills, and prevents dust infiltration


Our approach:

  • Air sealing is always performed after insulation removal (we can’t access bypasses otherwise)
  • We use expanding foam, caulk, and rigid foam blocking as appropriate for each gap type
  • Takes 2-3 hours for a typical 2,000 sq ft attic


Pricing:
$250 per 2,000 sq ft (minimum), with proportional increases for larger attics.

Why we require removal first: You cannot properly identify or seal all bypasses with 6-17 inches of insulation covering them. Removal → Air Seal → Re-insulate is the only sequence that delivers full performance.

Rebate bonus: SRP rebates specifically require air sealing combined with insulation upgrades (up to $600 total).

Common signs:

  • Droppings: Small pellets near vents, corners, or stored items
  • Odors: Musty or ammonia-like smells from attic access
  • Sounds: Scratching, scurrying, or chewing noises at night
  • Visible damage: Chewed wiring, insulation, or cardboard boxes
  • Grease marks: Dark smudges along rafters or walls where rodents travel


Phoenix-specific risks:

  • Pack rats and roof rats are common in Valley homes, especially near desert preserves
  • Attic vents with damaged screens provide easy entry
  • Monsoon storms can blow dust and debris into vents, creating contamination


What we check during free inspections:

  • Visual inspection of insulation surface for droppings, nests, or trails
  • Signs of entry points at vents, eaves, or roof penetrations
  • Evidence of moisture damage or mold (from roof leaks)


If contamination is found:

  • We recommend complete removal ($1.20/sq ft)
  • Disposal of contaminated material
  • After removal, attic can be sanitized if needed (coordinate with pest control)
  • Entry points sealed during re-insulation


Health concern:
Rodent droppings can carry Hantavirus and other pathogens—we use PPE and containment methods to minimize exposure risk during removal.

Peace of mind: Starting with a clean attic ensures your new insulation stays pristine for decades.

Still Have Questions? Let's Talk—Free Estimates & Inspections Available Daily 8am-10pm

Get Your Free Quote

Transparent Pricing • Comprehensive Inspections • Available When You Need Us